I recently presented a CCIE Security webinar on this topic because it’s a topic that is poorly documented and even not very well understood. Naturally, that is something I want to change, and the exact type of thing that this blog is exists for!
This blog post will dive into how ISE works with mobile devices… It is something that most materials will hand-wave over. Katherine & I went into a good amount of detail into this with the latest book, and I still don’t think it was enough. There is very little published that actually explains this, and I am writing this post to remedy that.
What this blog post will not cover: this is not a post designed to market or sell you ISE in any way. This is also not an introduction to ISE or BYOD concepts in any way. So if you need introductions to those concepts, you may get lost here & might want to try a different resource and then come back later.
So let’s get into this:
Traditional posture assessment with ISE uses a software agent (AnyConnect) to collect attributes from endpoints running desktop operating systems (Windows, macOS, Linux). This is because those operating systems allow software to run and collect the information from the system; and aren’t locked down to the “Nth degree” like mobile platforms are.
Mobile Platforms / Operating Systems are Different
The modern operating system that runs on mobile platforms; namely: Apple’s iOS and Google’s Android; are designed to be more secure, isolated, contained and MUCH more private than traditional operating systems.
Mobile “apps”, aka: software written for mobile operating systems, are sandboxed by nature. They are unable to gain access to system attributes, like the Mac-address or the unique identifier (UDID) of a mobile device; which is VERY different than what happens on the desktop platform.
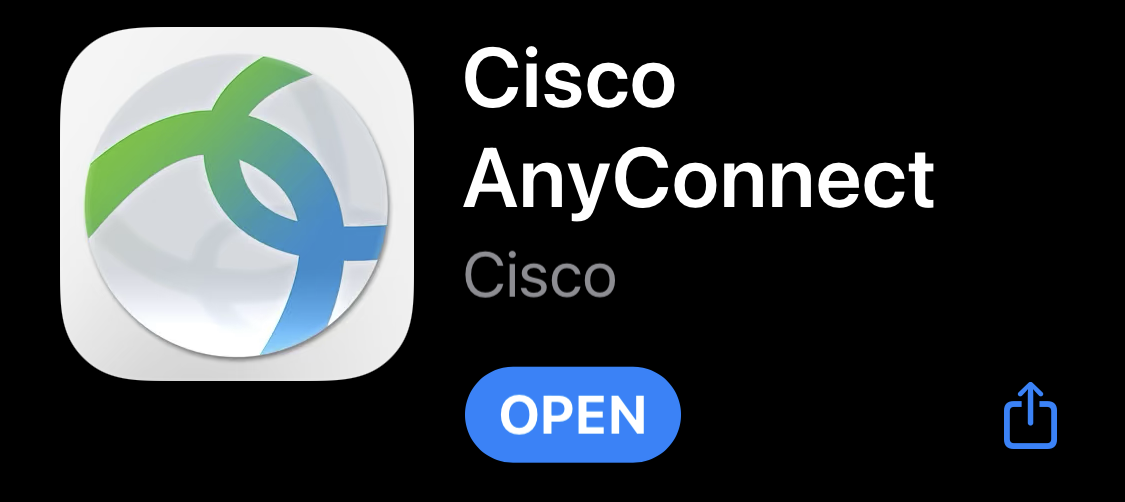
If you remember back in the day AnyConnect for iOS had to release a whole new version, renaming the old version with a “Legacy” label. A new AnyConnect for iOS was released because of Apple removing the ability for any application to access the “private” device information, like UDID and mac-addresses.

When you look at the mobile operating systems, they are sandboxed out of the gate. The easiest way to summarize this is that there is a Systems Manager API / framework that gates the access to system & security functions in these operating systems & it is why Cisco had to create a “new” version of AnyConnect that uses the approved frameworks instead of the way it used to work. This drawing attempts to explain the OS architecture in a simple way:
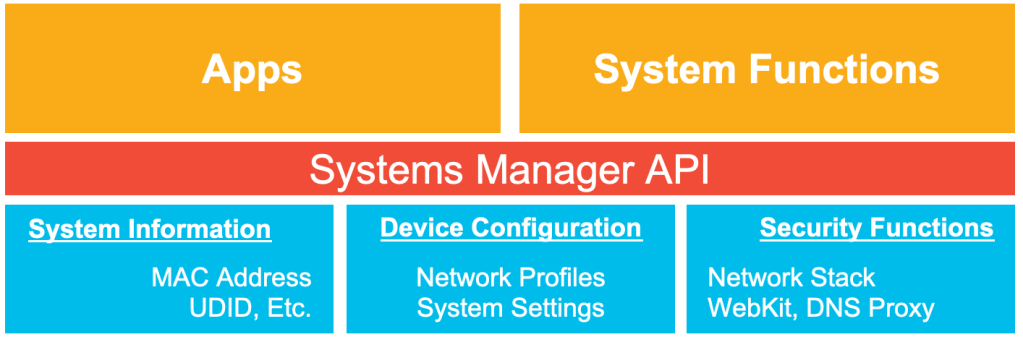
Many functions (represented in blue) are restricted to the “Device Owner” (aka: the Mobile Device Manager) application or framework only. That MDM is required to delegate the functions to the security apps & in some cases (Android) that MDM must also be the security app; no delegation is possible.
ISE must rely on 2nd hand information
The Device Manager has full knowledge of the endpoint. ISE/AnyConnect has no ability to see these details of the mobile device at all. Therefore, ISE must ask the MDM what it knows about the endpoint (i.e: what is its posture).
It’s also important to note that endpoints check-in with Device Managers periodically, depending on what the MDM is. For example: Microsoft’s inTune has devices check-in once per 8 hours & this is non-configurable. Most other managers have a 4 hours check-in time by default. The graphic below attempts to explain the flow for mobile devices and posture assessment.

In the above diagram, pay attention to the RADIUS access-request which contains the calling-station-id, which is the mac-address of the endpoint. Yes, that’s right! The mac-address! ISE sends the request to the MDM using the mac-address of the endpoint to identify it.
Why is this a problem?
In today’s world, we have devices that can and do randomize their mac-address when connecting to a network. This is a setting that can be and should be turned off for enterprise networks! Apple also ensures that the same private address is re-used for the same SSID when the SSID is using WPA-enterprise, but that still doesn’t help us lookup the endpoint through the MDM.


You can see above the network profile settings from Android & iOS, and you can even see how Android randomizes the MAC by default. iOS randomizes by default too, but it is less obvious in that screen shot.
ISE queries the MDM and is able to retrieve roughly 13 different attributes about the endpoint. The actual number of attributes depends on the version of the ISE MDM API implemented by the MDM vendor. Those attributes are retrieved during authorization, and exposed to the authorization policy through the MDM Dictionary for authorization conditions, as seen in the figure below:
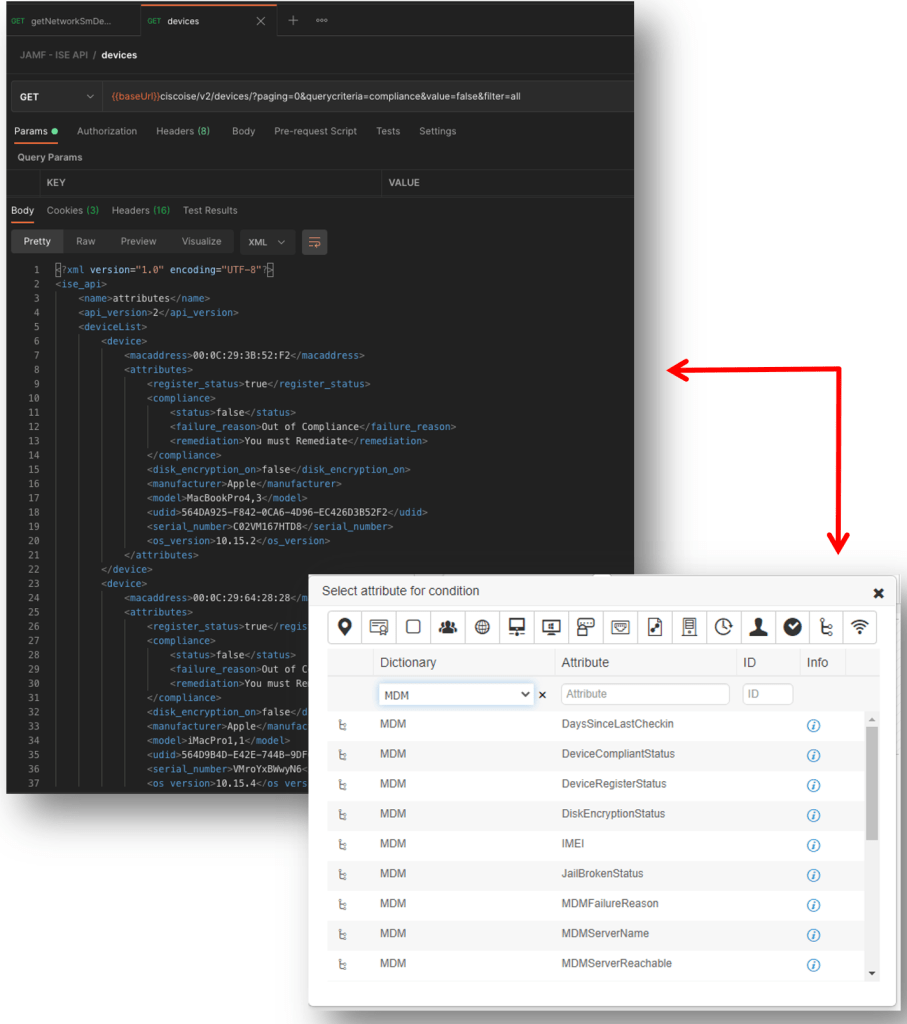
In the figure above you can see a screen on the left that displays the raw attributes of an API call to the MDM, using a tool known as Postman (if you do anything with REST API’s, then you’re most likely already familiar with Postman. If not, then you should get to know it). On the right-side of it, you see a screen shot of the MDM Dictionary used in ISE authorization conditions.
ISE and Multiple MDMs
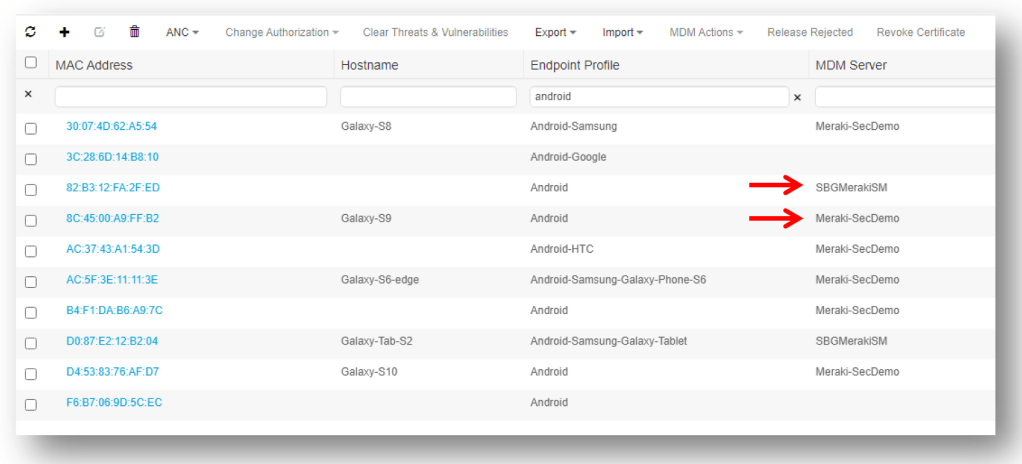
I have worked with more businesses than I can count, all around the world. Based on my experience, it is rare to find an organization that has one and only one device manager. It could be due to being in a transition from one to another that is supposed to be “temporary” – but as with most things in technology – “temporary” is just another word for “permanent” and now you have to maintain multiple solutions simultaneously.
So, the good news is: ISE does support multiple device managers with a single ISE install, as seen in the following figure.
Not so fast!!! This is not a sales or marketing article. I’m not here to sell you anything, and It’s my goal to ensure you know how things really work, not how they are marketed. In the real world, there are some very important things you should understand.
- There is no “hunt list”. In other words, unlike ISE’s identity source sequences (ISS) there is no MDM Sequence list where ISE will search each one in succession looking for the endpoint to see if it’s registered.
- When there is 1 (active) MDM, ISE will check it to see if the endpoint is registered there.
- When there are multiple MDMs and the endpoint’s registered MDM is not already known:
- ISE will not check each MDM one-at-a-time to identify which MDM the endpoint is registered to / managed by.
- The endpoint will simply be reported as “not registered”
In the current versions of ISE (3.0 and below) in order to work with multiple MDMs simultaneously, you must onboard the devices to your MDM through ISE’s BYOD onboarding flows. This behavior has received some complaints and I believe there is a change coming in the future to improve the ability to work with multiple MDMs. The following image is a rudimentary flow-chart just showing the basic flow for BYOD onboarding.

What about VPNs?
What a great question! I’m glad you asked! As I discussed above, AnyConnect does not have access to the mac-address or other identifiers from the hardware any longer. No apps do. This is why Cisco had to complete re-work the AnyConnect client for iOS and there are now two of them.

So, how do we get the posture of a mobile device when it’s using VPN – if we cannot access the mac-address to send to the MDM?
Introducing ACIDex – the unknown & unsung hero!
AnyConnect Identity Extensions (ACIDex, pronounced acid-X) is a VERY powerful & VERY useful extension to AnyConnect. Did you know it exists? Most people do not. ACIDex is used with all OSs, not just mobile, and it provides identity related attributes from the endpoint to AnyConnect headends, like the ASA or FTD.
Example:
endpoint.anyconnect.clientversion=”4.0.03004”
endpoint.anyconnect.platform=”apple-ios”
endpoint.anyconnect.devicetype=”iPhone7,2”
endpoint.anyconnect.platformversion=”9.0”
endpoint.anyconnect.deviceuniqueid=”11025f84e99351e807f3583343bfec96351cb416″
The following diagram attempts to show the flow for VPN with AnyConnect, ASA/FTD, ISE & the MDM.

We will now break down the above flow and dive much deeper into what’s going on here. Please understand that it works slightly differently for Android as it does for iOS. Android devices will use something known as AppConfig – a standard mechanism to push configurations to mobile apps. iOS must use a VPN profile instead of AppConfig, because the configuration is not only used in the App, but is used within a device-level framework.
Android Configuration Example:
Since the flow is also the same for setting up Umbrella for Android, I will show that in this example as well.
To begin, download the Android configuration file from Umbrella dashboard. Navigate to Deployments > Mobile Devices > Manage MDMs > Android Devices > Download Android Config File
Open the file in your favorite editor and note the organizationId and regToken for use in the configuration later.

We are using Cisco Meraki Systems Manager as the device manager in this example. From the Meraki SM dashboard, navigate to Systems Manager > Settings.
Add a Profile > Device profile (default) & then click Continue.
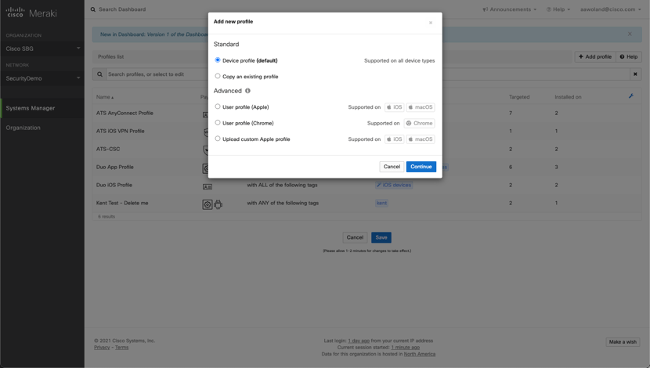
Name the Profile, and provide a description if you would like. You must select the “Targets” to install this profile on, and the easiest way is to use Tags. Provide a Tag for this profile which you will then assign to devices or groups of devices.
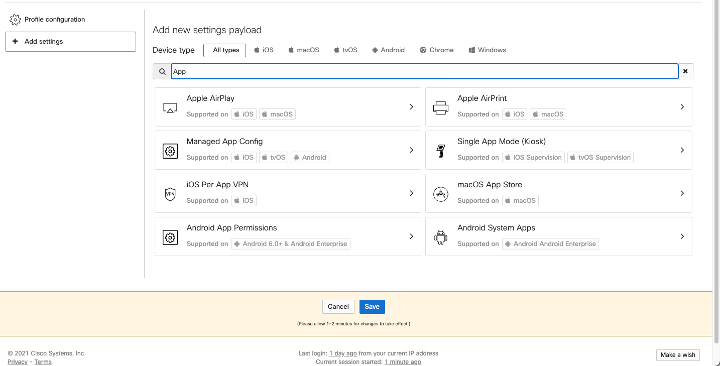
Click Add Settings, and then search for and select Managed App Config.
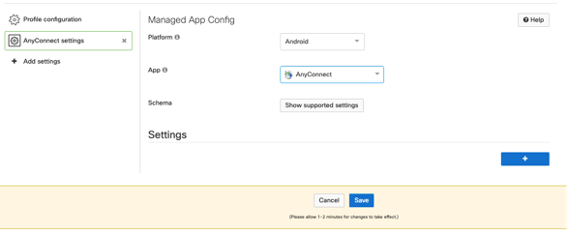
Chose Android in the Platform drop down.

Select AnyConnect from the App Dropdown

Click the Plus (+) sign to add settings to this AppConfig
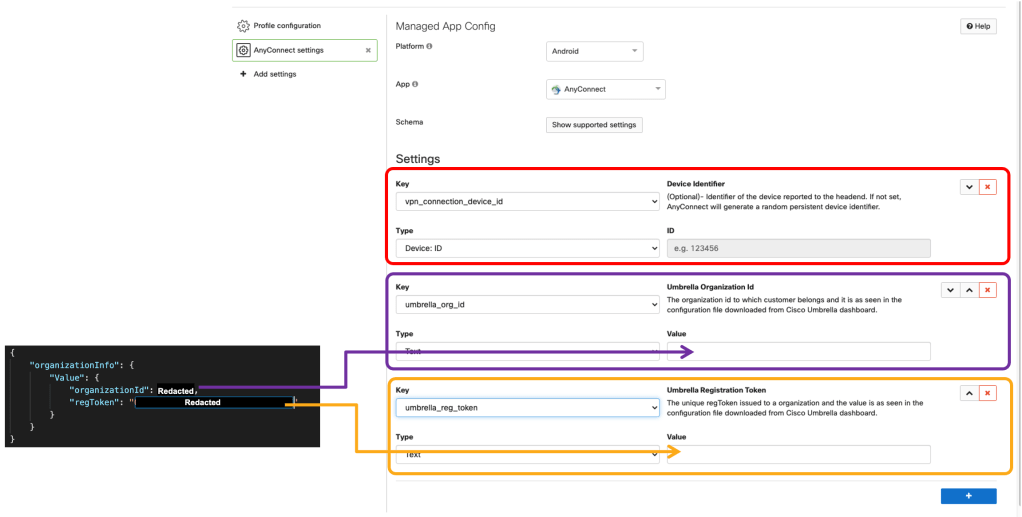
Select vpn_device_id from the list

Select Device ID from the Type Drop-Down. This automatically sets the value to the device’s UUID.
Next, add another setting for umbrella_org_id, pasting the value from the downloaded OrgInfo.json file. Then add a third setting for umbrella_reg_token, pasting that value from the same OrgInfo.json file.
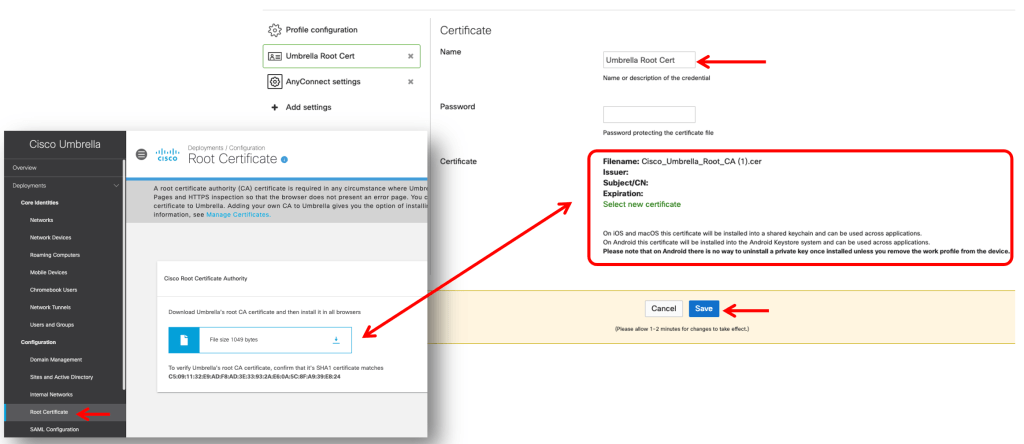
Add another Setting to the profile, search and select Certificate.
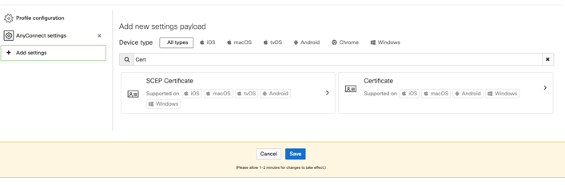
Upload the root certificate from Umbrella.
iOS Configuration with Meraki SM
This section is about the device identity for VPN only, not Umbrella. Umbrella on iOS leverages the Cisco Security Connector for iOS, not AnyConnect (as of the time of this writing).
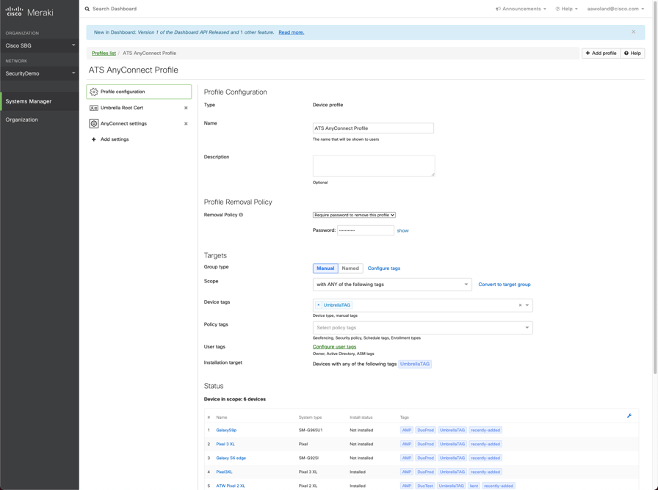
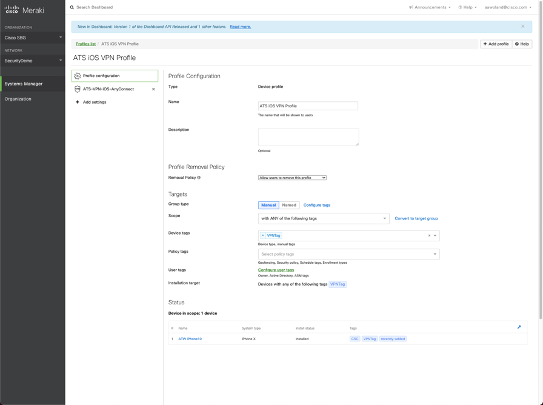
Add a new Profile, and use Tags to identify the correct Target endpoints to receive this profile. Just like with the Android Profile.
Click Add settings, search for VPN and select VPN Settings.

Choose Cisco AnyConnect as the Connection Type
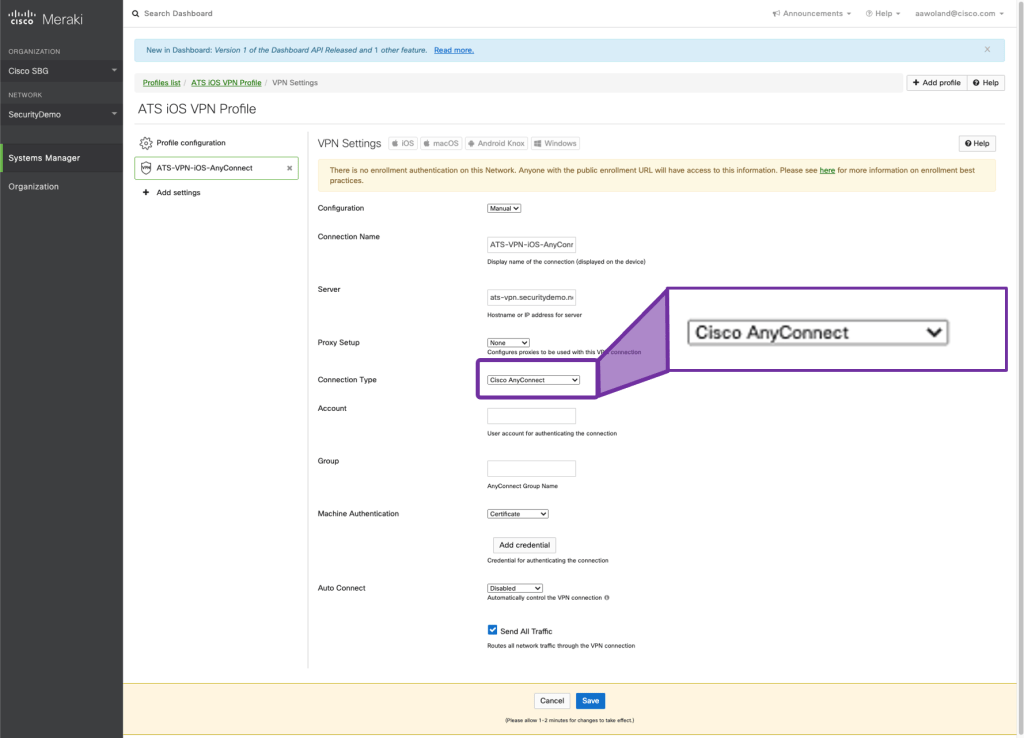
Click Save & You’re done! Meraki will automatically add the right identity value for AnyConnect on iOS.
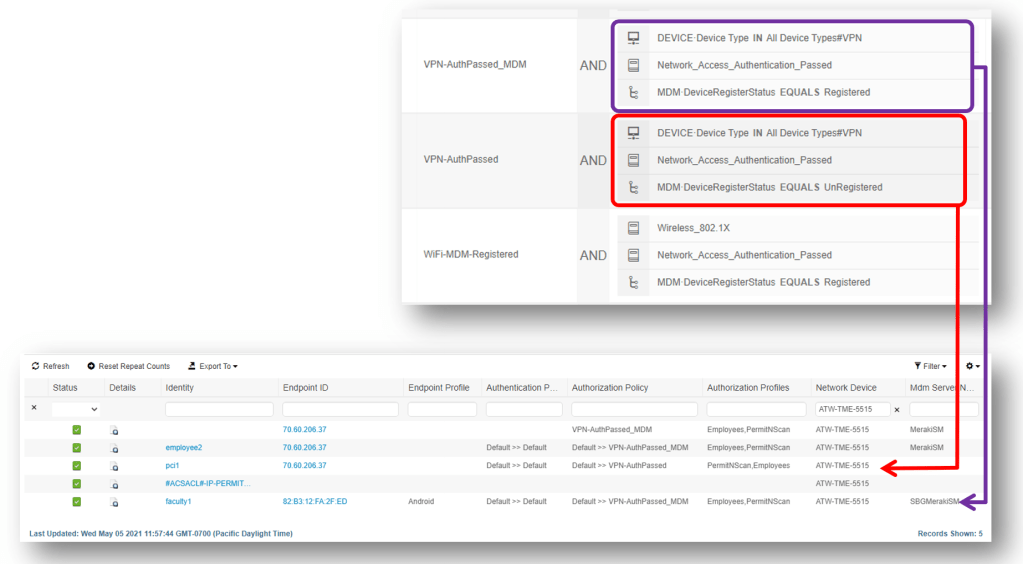
This last image validates the configurations as working – as you can see with the policies and the live-log output.