In ISE 1.0 Cisco introduced an integrated Guest solution with a next-generation RADIUS-based policy server. That policy server was game-changing, certainly. Other companies responded to this market changing model by making some very strategic moves with their chess pieces to be similarly positioned.
Figure 1 shows an example of the ISE 1.2.x (and below) Sponsor Group Policy.

While ISE 1.0 was and is an extremely powerful policy server, it was also viewed as being overly complex and not flexible enough in the areas of Guest life-cycle management. This was especially true when comparing ISE with it’s closest competitors in the guest access management space.
“So, let this be said: the gauntlet has been thrown down, but [Cisco] have answered, and answered with vigor.” -Gerald Lambeau, Good Will Hunting
ISE 1.3 introduced a completely re-written Guest solution that greatly simplifies the deployment and allows for high-levels of customization. Things have been simplified GREATLY, but unfortunately some of the power got lost at the same time.
This blog will focus on one specific piece of functionality that was lost, and a brilliant work around that one of my colleagues, Craig Hyps, has devised.
The Missing Functionality:
The ISE Guest solution uses Sponsor Groups to dictate the permissions the employee will have. In other words, the Sponsor Group determines which types of guest users that can be created, how long those accounts can be active, if the sponsor is allowed to create random/bulk accounts, etc… From ISE 1.0 through ISE 1.2.x, the ISE administrator had the ability to build very complex IF..THEN.. type of policies to determine which Sponsor Group the employee should be mapped to. To provide some more clarity of my statement, let’s put that into an IF… Then… format:
IF the LDAP/AD attribute named Manager is Yes
THEN assign them to the Manage_All_Accounts Sponsor Group in ISE.
ElseIF the LDAP/AD attribute named Manager is No
THEN assign them to the Manage_Own_Accounts Sponsor Group in ISE.
In ISE 1.3, it was simplified tremendously because (while it was powerful) it was also very complex for admins to figure out. However, during the simplification process, come of the power was also removed.
After extensive customer interviews and planning, the design decision was made to simplify Sponsor Group membership for external users (i.e.: user accounts that exist in Active Directory (AD) or LDAP) by mapping to groups in that external identity store. To provide some more clarity on my statement, let’s put that into an IF… Then… format:
IF sponsor is a member of the AD group named “SponsorALL”
THEN assign them to the Manage_All_Accounts Sponsor Group in ISE.
ElseIF sponsor is member of the AD group named “SponsorOwn”
THEN assign them to the Manage_Own_Accounts Sponsor Group in ISE.
Figure 2 shows the new, simplified sponsor model in ISE 1.3 & 1.4.

So you can see the logic behind the mapping of the external identity that exists very commonly in Active Directory & the local Sponsor Group that dictates the employee’s permissions for creating guest accounts. For 90-95% of environments, this type of mapping is perfect. However, there are a few instances where that extra power of looking at attributes instead of or in addition to groups is needed.
“Simplicity is the Key” -Ritchie Blackmore
Well if simplicity is the key to be one of the greatest musicians of all time, maybe that makes Craig Hyps the “Ritchie Blackmore of network access” 🙂 In my 10 years of working with him, he never fails to amaze me with some of the creative workarounds that he is able to come up with, and this blog is detailing one of those brilliant-yet-simple workarounds.
Craig’s Brilliant Yet Simple Work Around
Basically, the answer to the puzzle is to “Lie to ISE”. Configure a new LDAP Identity Source that points to your LDAP server, but configure the group string to be the LDAP attribute that you want to use, instead of an actual group. Think about it, it will see the attribute as the group name & the value of the attribute as the “members”.
Using the example from above, it means the IF… Then… Logic would look like:
IF sponsor’s group has a member named “Yes”
THEN assign them to the Manage_All_Accounts Sponsor Group in ISE.
ElseIF sponsor’s group has a member named “No”
THEN assign them to the Manage_Own_Accounts Sponsor Group in ISE.
This way, ISE thinks there are groups named Yes and No, and that will be the choices in the ISE GUI.
Let’s configure this:
For simplicity sake, I added a value of Yes or No to an existing attribute in my LDAP server (Active Directory). I used the Job Title field, which translates to the “title” attribute via LDAP. Figure 3 shows the graphical Job Title field that I am using.

Of course most organizations would have a custom attribute to use, such as “Manager”, or “isManager”, or something like that. However, for purposes of keeping this example easy, I am just re-using the existing attribute of “title”.
Now, we need to create a new LDAP Identity Store within ISE, just for use with the sponsor portal login.
Navigate to: Administration > Identity Management > External Identity Sources > LDAP. Click Add.
Provide a name that will help you identify this later as being used just for Sponsor portal login. You will see in Figure 4 that I used “SecurityDemo_Sponsor”, where the _Sponsor suffix is helping me to document why this Identity Store exists.
Choose the base schema to start with (I used Active Directory), as seen in Figure 4. Then modify the Group Objectclass and the Group Map Attribute fields to be the LDAP attribute that you are mapping to. It’s very important to choose Subject Objects Contain References To Groups. This is the option that will tell the LDAP connector to look for the Group within the subject (the user’s account).

You must fill-in the Connection tab with the correct IP Address(es) and credentials for the LDAP bind. That is no different in this scenario, so I will skip that tab.. However, the Directory Organization tab is required before you can save the connection. Figure 5 shows you the example Directory Organization tab.

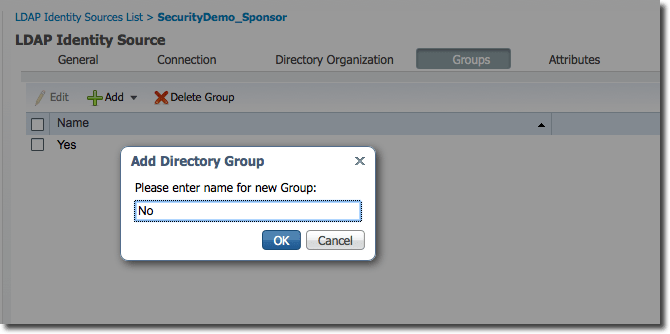
The Groups Tab is next. Normally, you can search the directory for the groups & add them. That will not work in this case. You have to manually type the values (Yes, No) instead. Click Add.
Add each value (one at a time) for the attribute that you are mapping to and click Ok. In our example, the value of title can only be Yes or No, where Yes means they get full sponsorship and No means they will get limited sponsorship capabilities. Figure 6 shows the Groups tab where the “Yes” group has already been added, and the “No” group is being added.
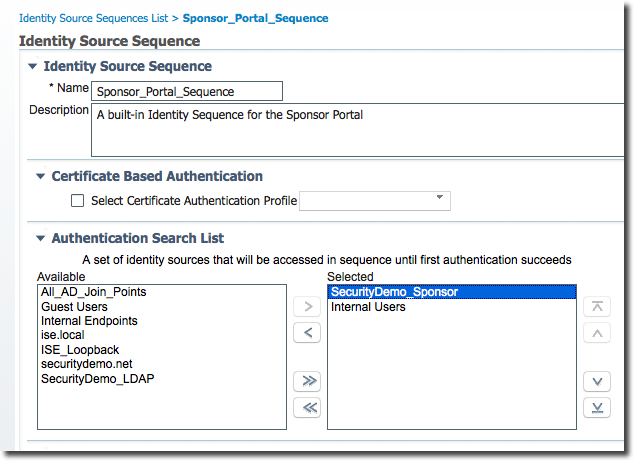
The LDAP portion is complete. Don’t forget to click Save when you are done! Now you need to configure the Sponsor portal to use the new LDAP connection. By default the Sponsor Portal will use the Identity Source Sequence (ISS) named “Sponsor_Portal_Sequence”. You need to ensure the new LDAP Identity Source that you just created is used within in this sequence.
Navigate to: Administration > Identity Management > Identity Source Sequences and click on Sponsor_Portal_Sequence to edit it. Ensure that the new _Sponsor identity source is in the list, and the original LDAP join is not. Figure 7 shows the ISS.
Don’t forget to click Save when you’re done! Now you need to assign the correct sponsor users to the Sponsor Groups. Navigate to Guest Access > Configure and select Sponsor Groups on the left-hand side.
Select the Sponsor group you are configuring, or create a new one. Click the Members button. Choose the new “group” based on the LDAP attribute. In this example, I have selected SecurityDemo_LDAP:Yes because this is the All_Accounts sponsor group & I want managers to be part of this sponsor group. Figure 8 shows the “Yes” group being added to the Sponsor Group.

Don’t forget to click Save when you’re done! Repeat this process for each Sponsor group that you need to add members to.
Th-Th-Th-That’s all Folks! -Porky Pig

You must be logged in to post a comment.